Thursday, December 17, 2009

Thursday with Dorie: Banana Loaf


Well, I did not joint the Tuesday With Dorie (TWD) dedicated to Dorie Greenspan's recipe book. But to my delight, I have been using her book to learn very basic recipe for first timer.

This is second time I made marble cake based on Black and White Banana Loaf. The result was mixed, but it getting better. I used plaintain rather banana which give texture, but lose some delicate smoothie taste. Plaintain also did not have some of water content, made the dough slightly stiff. On the book said 1/2 cup of whole milk but I brave myself only using 1/4 cup reduced fat milk to achieve ideal mix.

Chocolate here from Lindt dark chocolate. It taste bitter but strong color, enrich the loaf into pure pleasure. I thought the cake just speak itself without any 'playing around'. I did not put anything such as nuts or shredded coconut. Yum...I am having a piece with delicate Yorkshire tea.

Wednesday, December 9, 2009

Stollen: I am eating Jesus's blanket


The story about this bread is mesmerizing me. It's been told that a Prince in Saxon Kingdom (near Germany) wrote to the Pope to add butter on this seasonal festive bread. Until five Popes died then Pope Innocent VIII gave permission to allow the Prince and family added 'secret ingredients' that make this bread taste lovely.

In contemporary era, the bread become a symbol of Christmas specially the city of Dresden. I don't really know why it said like Jesus's blanket. Probably because the sugary powder reflect the white celebration.

This is second time I made Stollen from Peter Reinhart book Bread Baker Apprentice. I found the recipe is easy to follow which only takes 4 hours (oh yeah...most of recipe on those book takes hours or days). Last week I went down to City of Berkeley and bought a piece of Stollen from local bakery. It turned out not so nice, then I decided to challenge myself.

I did two portion of the recipe, using about 2/3 active dry yeast. I was using some tropical dry fruits to add the blitz, including golden raisins. In recipe said to add marzipan in the middle to enrich the ingredients. Since I am using flip method to create the shape, I decided to use almond puree.

I followed closely on the direction including resting time for 10 minutes after mix which gave dough time to rest. Also to train my hands, I managed to knead 6 minutes rather than 2 minutes on the machine.

Overall, the Stollen taste so good that we already eaten half. We loves the texture, not too sweet but the taste came from the dry fruits and almond, perfect as a company with tea or coffee.

Recipe in web version can be see at CookingRoute

Monday, August 10, 2009

Lenox Almond Biscotti : remembering Julia


For the joy of French’s memory, I went cinema to Julie & Julia. I was expecting some fresh air, good laugh and warm-hearted. Indeed the movie showed most of those, which make foodie like me in happy tears. Well, food just the background but the story about the journey of two women, did inspire me, by Julia and Julie for their own time tunnel.

I grew fondness of French baking not trough Julia Child, but merely from contemporary Dorie Greenspan. Dorie worked for Julia during PBS’s Baking with Julia, wrote a book to accompany the program. I haven’t dared to start ‘proper’ Cordon Bleu regime to build my baking skill. For the confidence side, Julia might say, “Never apologized.”

Since I killed cable subscription, I became involve in most PBS cooking such Jacques Pepin –who turned out to be Julia’s friends. I found him very forgiving, clear description and very technical. Somehow he reminded me with father in law in the kitchen. They are extraordinary, with passion of making food looks simple and doable.


These biscotti just another sample of over-expected. I found the recipe very easy and straightforward, but turned out to be lots messy than usual. The dough seemed too short, in resulted just crumbly. Through TWD, more people found similar difficulties. Dough became to runny, taking extra time to bake and shape not easy to work with. I followed all the steps in moderate, while reducing sugar contents is more likely give an impact of workability while whisking eggs, sugar and butter might the key. It needs slightly longer to let expand and bind the dry ingredients.

I added dry cherry which is my favorite because of sourness. Some people suggested to bake in higher temperature at first 15-20 minutes then reduce into 350F second bake. Also leave the dough at fridge for 1-2hours will make easy to split into two or three dough. As Julia said to never apologized, I guarantee that this biscotti taste like heaven.


Recipe can found here or here. This site is a brilliant step by step of making biscotti with pictures!

Friday, August 7, 2009

Being fresh & salsa


Mexican food became our weekly menu since we lives in California. Fragrance of cilantro leaves, smoothness of avocado and striking hot of chillies bound me with this land. California always known for great community of mexican. We inherited their passion of fresh ingredients, prepare with labor of love and of course starchy tortilla chips.

I visited Crate&Barrel yesterday and found Molcajete -stone grinder on sale. Once I tried to buy similar grinder from Java, then it was to heavy that excess my baggage allowance. The grinder quite similar, but molcajete has three legs. Javanese grinder tends to be wide and no leg with shallow surfaces. Mexican uses most for making dipping, while Javanese uses for sambals.

This summer my tiny garden prove itself to make guacamole. Well, I don't have big garden but just enough to produce tomatoes, lemons, serrano chillies. These recipe taken from simplyrecipe and mango salsa is just modification.

Perfect Guacamole


1 ripe avocado
1 serrano chillies
1 tablespoon cilantro leaves, finely chopped
1 tablespoon fresh lime
sprinkle salt
some fresh grated pepper
1/2 ripe tomatoes, seeded and pulp removed, finely chopped

Direction :
  • Cut avocado, mash in mixing bowl using fork.
  • Added chopped onion, cilantro, lime/lemob, salt and pepper.
  • Keep the chopped tomatoes separated.
  • Cover with plastic wrap on the surface of guacamole to prevent oxidation from the air reaching it. Refrigerate until ready.
  • Just before serving, add the tomatoes.
  • Serves with tortilla chips


Mango Salsa

1/2 ripe mango, cubed
some chopped sweet pepper
1/2 serrano chilli
1 tablespoon fresh lime/lemon
1 tablespoon cilantro leaves
2 tablespoon of grape fruit
salt & pepper

Mixed all ingredients and leave it chill at least half an hour before serves. It can be eat as dipping with tortilla chips or adding sour for meal.


Friday, April 24, 2009

Bread Baking with Pizza Napoletana


A day when I bought a book from Peter Reinhart : Bread Baker Apprentice, I realized that bread baking is not an easy task. The book is excellent, full of detail how to create best bread through fermentation stages. But it takes most of the recipe several hours to days to actually produce beautiful handmade bread.

We've been tried several recipes, but the easiest and worthiest is Pizza Dough Napoletana. Even though the whole process is quite tasking, I began to understand the essential of baking bread. It must be patient and follow the instruction strictly. It could be hard for beginner like me, but in the end it was a rewarding, a nice piece of bread with lovely smell filling in your kitchen. It was worth for every minutes you've spent.

We loves pizza so much, so we decided to try create our own pizza dough, putting the topping as our preferences. For trial we've using different flour from whole wheat, all purposes into bread flour. The regime was detail but make sense in many form of food science. The flour should be chilled first to let it not so fast react when mixed with yeast. It's all about chemistry and math. (It does as the book excerpt the formula into baker's percentages)

The size of dough is about right for two. The recipe let us to divide into six dough that can be frozen until 3 month. (It's rare to reach that time limit, always less than two months because we are pizza mania). To thaw and let the yeast back to life only need a day in the fridge, and two hour in room temperature. The last batch we did with bread flour made the dough more spongy, increasing size in significant amount. It also create crispier crust with lovely bubble of air.

Other key feature on pizza making is the stone bread at high temperature oven. (Peter suggested 500-550F which done by stone to distribute the heat evenly ). We've experimenting all sort of combination of topping, but turned out the Anchovies and smoked salmon with green pesto is the best one.


Anchovies and Smoked Salmon Pizza

Ingredients
1 Pizza dough Napoletana from Peter Reinhart's (recipe here at Heidi Swanson, let two hours in room temperature if the batch fresh or thaw a day before in refrigerator.
Olive oil for spraying
All purpose Flour for dusting
Semolina for layering on the stone

Topping :
2 tablespoon of green pesto, fresh on olive
two big flanks of smoked salmon, we uses most Scottish one
couple tablespoon anchovies
sun dried tomatoes chunks
handful of green olives
1 cup fresh mozzarella cheese
1 cup shredded Swiss cheese
Note : use most of topping with oil based rather brines as water usually seep into the dough, it will finished with no solid bread surface.

  • Punch the pizza dough to reduce the air, then start stretching (follow the instruction from the recipe). If you facing hole or very thin layer, do it again once until you get the nice even thickness. Do not let hole as it tends ruin the topping and whole performance.
  • Spread the green pesto on top of dough, followed by salmon and anchovies. Filling the gap with cheeses and olives.
  • Slide the pizza onto the oven using pizza peels with semolina flour on the base. Bake for 2 minutes then rotate to another 5-8 minutes. (the pre-heat should be done half an hour before or more to let the stone ready).
  • Let it rest for 1-2 minutes then cut, ready to serve.

Thursday, April 16, 2009

Breakfast with scones and lemon marmalade


Practically marmalade is bitter and sour jam made from oranges. Living in this country, which loves sugar so much, I found difficulty to buy decent raw material. I have been around farmer market, asking if there were Seville Oranges. Most of California's oranges, such Navel or Valencia were design for juicing.

Then someone gave us bag of lemon, fresh from tree. Idea to make marmalade from lemon comes up mixed with lime to add sourness. To create marmalade that locally grown is bit adventurous. The recipe below came from Allotment UK -community garden which probably straight forward. But for beginner, I recommend to look up at Simply Recipe along with pictures and detail how to make it.

The key is pectin, the ingredients that contains at seeds of lemon. Due the low contents of pectin at lemon, we reduced the water. It's better to leave the seeds, pips and pith soaked overnight with the cheese bag.

Marmalade best served with scones for breakfast. I managed to create British type scones at small round than triangle shape. (In North America, this is refer to buttermilk biscuit so don't get confuse). The buttery taste of scones and kick of lemon marmalade is perfect combination to start another hard day.


Lemon Marmalade

Ingredients:
  • 2 lb (900 g) lemons (we added 2-3 limes)
  • 6 pints (3.4 litres) water (Note : we reduce the amount of water into 3 liter)
  • 1½ lb (675 g) sugar per 1 lb (450 g) pulp


  1. Wash and dry the fruit. Cut in half and squeeze out the juice. Remove the pips, inside skin and pith. Tie these in a piece of muslin.
  2. Cut the peel finely or coarsely, according to preference.
  3. Put the peel in a large bowl with the bag of pips etc and the juice. Add 6 pints of water and leave to soak overnight.
  4. Weigh the preserving pan and make a note of it. Put the soaked peel, pith and pips into it with the water and juice.
  5. Bring to the boil and simmer gently until the peel is soft and the contents of the pan have been reduced to half its original bulk. This will take about 1½ hours.
  6. Lift out the bag of pips and pith, squeezing it again the side of the pan with a wooden spoon.
  7. Test for pectin.
  8. Re-weigh the pan and subtract from this weight the original weight of the empty pan to calculate the weight of the remaining pulp.
  9. Add 1½ lb (675 g) of warmed sugar to each 1 lb (450 g) of pulp, stir until all the sugar has dissolved.
  10. Bring to the boil and boil rapidly until the marmalade sets when tested.
  11. Remove the scum and leave to cool slightly.
  12. Pot and seal whilst still hot.

Makes about 6 lbs (2.7 kg) of marmalade.

CREAM SCONES

Ingredients :

1 large egg
2/3 cup heavy whipping cream
2 cups all-purpose flour
2 Tbs granulated sugar
1 Tbs baking powder
¼ tsp salt
5 Tbs unsalted butter, cut into small pieces and chilled
¾ cup moist, plump currants (optional)


1. Center a rack in the oven and preheat the oven to 400°F. Line a baking sheet with parchment or a silicone mat.

2. Stir the egg and cream together.

3. Whisk the flour, sugar, baking powder and salt together in a large bowl. Drop in the butter and, using your fingers, toss to coat the pieces of butter with flour. Quickly, working with your fingertips or a pastry blender, cut and rub the butter into the dry ingredients until the mixture is pebbly.

4. Pour the egg, cream and currants over the dry ingredients and stir with a fork just until the dough, which will be wet and sticky, come together. Don’t overdo it. Still in the bowl, gently knead the dough by hand, or turn it with a rubber spatula 8 to 10 times.

5. Lightly dust a work surface with flour and turn out the dough. Divide it in half. Working with one piece at a time, pat the dough into a rough circle that’s about 5 inches in diameter, cut it into 6 wedges and place it on the baking sheet. (At this point, the scones can be frozen on the baking sheet, then wrapped airtight. Don’t defrost before baking- just add about 2 minutes to the baking time). Note : I created small round dough as British traditional scones.

6. Bake the scones for 20 to 22 minutes, or until their tops are golden and firmish. Transfer them to a rack and cool for 10 minutes before serving, or wait for them to cool to room temperature.

Yield: 12 small scones
Recipe Source: Adapted from Baking From My Home to Yours from Recipegirl

Saturday, April 11, 2009

Birthday Celebration : Indulge myself with decadent carrot cake

In the last two weeks I have been battered by nasty cold. Then I realized my birthday just passed with pile of acetaminophen and paracetamol, I did not regret it. I need a rest, a very good rest. In the middle of snotty nose and feverish state, somehow I asked my self why God created virus to human. Homo Sapiens need to be tested. If you pass, its body learn to cope, creating system to protect from similar illness. Well, nature selection is about adjusting into environment.

When I am feeling little better, I'd like to pamper myself. I choose to make very own birthday cake. Rambling around I found 
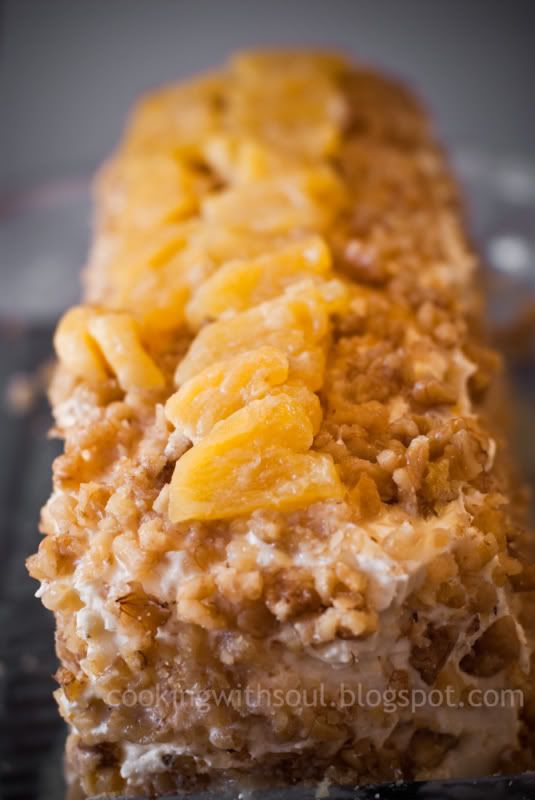
video from Tyler Florence. It's carrot cake with cream cheese frosting on top, which match with our purposes to reduce sugar contents. Carrot cake is always our preference, while the Cointreau syrup enrich overall orange taste.

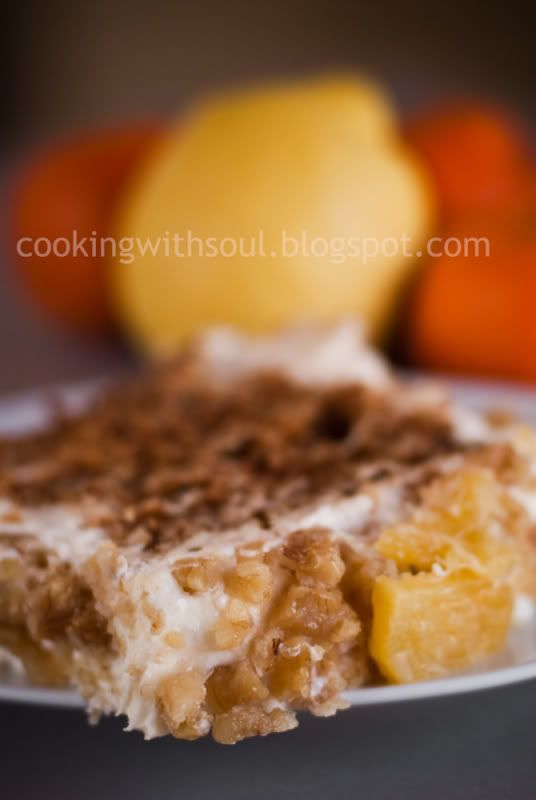
Pineapple always being my childhood memory. My grandmother used to sell beansprouts in local market every morning. When I visited her during school holiday, she asked me what I like to eat when she back from market. Well, I can asked anything, but always pineapple. Most of her grandchildren asked pocket money, while I was happy with these fruit, available cheaply in the market in Java. In US pineapple become such a delicate and exotic option. It's sourness with lots of juice make it good combination on the cake.


"BIRTHDAY" CARROT CAKE WITH CREAM CHEESE FROS...
Tyler Florence

Yield: 1 large cake, serves 8-10
Time: 1 hour 45 minutes


Ingredients
1 1/2 cups finely minced carrots (looking at the video seemed like Tyler added extra cup, I suggest make it 2-2.5 cups)
1/2 cup crushed pineapple, drained
3/4 cup finely chopped walnuts

2 1/2 cups, all-purpose flour, plus extra for pan
1 teaspoon baking powder
1 teaspoon baking soda
1/4 teaspoon ground allspice
1/2 teaspoon ground cinnamon
1/4 teaspoon freshly ground nutmeg
a pinch of kosher salt

1 cup buttermilk
1/4 cup molasses (I uses dark molasses, so reduce into 30-50% than on the recipe)
4 large eggs
3/4 cup vegetable oil
1 1/2 cups dark brown sugar


Direction
  1. Preheat oven to 375 degrees F. Butter a jelly roll pan and line with parchment. Set aside.
  2. Take the carrots and chop into large pieces then mince in a food processor until you have a fine texture.
  3. Drain pineapple and finely chop walnuts. Set aside.
  4. In a large mixing bowl add flour, salt, baking soda, baking powder and spices together.
  5. In a separate bowl ( I am using standing mixer) mix buttermilk with eggs, vegetable oil, molasses. Pour dark brown sugar bit by bit until the batter looked spongy and corporate together about another 3-4 minutes.
  6. Now pour dry ingredients together to make a batter for 5 minutes with medium speed. Then fold in the carrots, pineapple and walnuts.
  7. Pour into the prepared pan and bake in the oven for 25-30 minutes until cake is set and springs back when gently pressed in the middle.
  8. Remove the pan from the oven and allow cake to cool on a rack while you prepare the frosting and cointreau carrots (recipes below). Once the cake has cooled, cut into three rectangles by cutting the cake lengthwise twice.
  9. Stack the cake up into three tiers with cream cheese frosting in between each layer. Frost the outside of the entire finished cake - smoothing off the edges and corners (an offset spatula works well). Smudge walnuts on every side of cheese cream fros. Top with Cointreau pineapple rounds and drizzle a little of the syrup on top as well.


CREAM CHEESE FROSTING:

Ingredients
2 lbs cream cheese, room temperature for 3-4 hours
2 sticks of unsalted butter, room temperature
1 teaspoon vanilla extract
1 teaspoon lemon zest
2 cups powdered sugar

Direction
Using a kitchen mixer, combine cream cheese and butter until blended and you have a smooth, light texture. Note : cut butter into small cubes and add it bit by bit on the cream cheese, otherwise you will end up with lump of butter on the bottom of the mixer bowl.
Add the vanilla, lemon zest and powdered sugar and beat until combined. Continue to beat until smooth and glossy - about 7 minutes.

COINTREAU PINEAPPLE:

Ingredients
1 cup pineapple, cut in size
1/2 stick unsalted butter
2 tablespoons sugar
1/4 cup Cointreau (or 50ml from small bottle)
pinch of salt

Direction
Add carrot, butter, sugar, cointreau and salt to a small saucepan over medium heat. Bring to a simmer and reduce until syrupy - about 5 minutes.

This is the video version :
Birthday Celebration: "Make a wish over this decadent carrot cake topped with Cointreau Carrots."

Sunday, March 22, 2009

Tribute-To-Katherine-Hepburn Brownies


This brownies either addictive and soul bearing. I did today to treat my self as remind me to Mr. C who thousands mile apart. I love the story of this recipe from Dorie Greenspan. She said :

After Katharine Hepburn died, eulogies came from every quarter, many including stories about her brownies. In an article sent to me by my friend Bon Appetit editor in chief Barbara Fairchild, Heather Henderson of St. Paul, Minnesota, recalled wanting to quit her studies at Bryn Mawr. Her father managed to get Miss Hepburn, a Bryn Mawr alum and a neighbor, to intervene. The famous Kate invited both the young woman and her father to her home one afternoon. At tea, Ms. Henderson got a taste of the legendary brownies as well as of the actress’s views on education.

In her tribute to the actress, Ms. Henderson wrote, “I’ll always be grateful to Miss Hepburn for making me stick it out at Bryn Mawr and for giving me these rules to live by: 1. Never quit; 2. Be yourself and 3. Don’t put too much flour in your brownies.”


Best chocolate is the key of good brownies. So I am using Forgiveness Newtree Belgian Choc which contains 73% cocoa. Slightly essence of lemon on it give a fruit bite but not overwhelming. On the recipe, choc been added after eggs and dry ingredients. I decided to melted choc first on the butter mix as I don't have time to chop choc in small sizes.

I found Ghiraldelli cocoa powder is enough to adjust with dark choc, also instant coffee need to grind first to achieve finest texture before added to butter mix. For filling I could not find walnuts so pecans is the best choice. On top of brownies I decided to put shredded almond just to give a character.


Tribute-To-Katherine-Hepburn Brownies

Taken from From My Home to Yours book by Dorrie Greenspan.


Ingredients

  • 1/4 cup all-purpose flour
  • 1/2 teaspoon ground cinnamon (optional)
  • 1/4 teaspoon salt
  • 1 stick (8 tablespoons) unsalted butter, cut into 8 pieces
  • 1/2 cup unsweetened cocoa powder
  • 2 teaspoons finely ground instant coffee
  • 2 large eggs, preferably at room temperature
  • 1 cup sugar
  • 1 teaspoon pure vanilla extract
  • 1 cup broken or chopped walnuts or pecans
  • 4 ounces bittersweet chocolate, coarsely chopped

GETTING READY:

  1. Center a rack in the oven and preheat the oven to 325 degrees F.
  2. Butter an 8-inch square baking pan and line the bottom with parchment or wax paper. Butter the paper, dust the inside of the pan with flour and tap out the excess. Place the pan on a baking sheet.
  3. Whisk the flour, cinnamon, if you’re using it, and salt together.
  4. Put the butter in a medium heavy-bottomed saucepan and place the pan over low heat. When the butter starts to melt, sift the cocoa over it and add the instant coffee. Continue to cook, stirring, until the butter is melted and the cocoa and coffee are blended into it. Remove from the heat and cool for about 3 minutes.
  5. Using a whisk or a rubber spatula, beat the eggs into the saucepan one at a time. Next, stir in the sugar and vanilla (don’t beat anything too vigorously — you don’t want to add air to the batter), followed by the dry ingredients, nuts and chopped chocolate. Scrape the batter into the pan.
  6. Bake for 30 minutes, at which point the brownies will still be gooey but the top will have a dry papery crust. Transfer the pan to a rack and let the brownies cool for at least 30 minutes. (You can wait longer, if you’d like.) Turn the brownies out onto a rack, peel away the paper and invert onto a cutting board. Cool completely before cutting into 16 squares, each roughly 2 inches on a side.

SERVING: These are happy being served in all the typical ways — with whipped cream, ice cream or Hot Fudge Sauce or paired with a glass of milk to allow for dunking. I think they are best at room temperature, when they are at their moistest, but they are also very good chilled.

STORING: Wrapped well, the brownies will keep for 3 days at room temperature or frozen for up to 2 months.


Thursday, February 26, 2009

Balado Ati & Rempela Ayam (Chicken Heart Balado Curry with Aubergine)


This dish came from Padang, West Sumatra Indonesia. I love the richness of curry blended with hot spices. You can buy chicken heart and gizzard available at any supermarket in US. I got balado (red curry) paste Kokita bought from 99Ranch Market in Sunnyvale. If you want to reach the freshness you can make your own red curry paste.

Preparation : 10 minutes
Cooking 10 minutes

Ingredients
250-230gr chicken heart & gizzard, washed, reduce the fat and boiled
1 medium aubergine
2 cups of coconut milk
4-5 tablespoon balado paste (it's up to your level of hotness)
1 lemongrass, crushed
1 cup of hot water

How
  1. Cut aubergine and fry in the pan/pan with enough vegetable oil (aubergine tends to eat up all liquid). Let it half cooked in both side and set aside
  2. Put just drip of vegetable oil on the wok and quick fry the balado paste.
  3. Then add the chicken heart and gizzard.
  4. Mixed together then add the aubergine
  5. Pour in coconut milk along with the hot water
  6. Let it simmer for about 10 minutes with lemongrass on it
  7. Served with rice.