Showing posts with label american. Show all posts

Thursday, December 17, 2009

Thursday with Dorie: Banana Loaf


Well, I did not joint the Tuesday With Dorie (TWD) dedicated to Dorie Greenspan's recipe book. But to my delight, I have been using her book to learn very basic recipe for first timer.

This is second time I made marble cake based on Black and White Banana Loaf. The result was mixed, but it getting better. I used plaintain rather banana which give texture, but lose some delicate smoothie taste. Plaintain also did not have some of water content, made the dough slightly stiff. On the book said 1/2 cup of whole milk but I brave myself only using 1/4 cup reduced fat milk to achieve ideal mix.

Chocolate here from Lindt dark chocolate. It taste bitter but strong color, enrich the loaf into pure pleasure. I thought the cake just speak itself without any 'playing around'. I did not put anything such as nuts or shredded coconut. Yum...I am having a piece with delicate Yorkshire tea.

Friday, April 24, 2009

Bread Baking with Pizza Napoletana


A day when I bought a book from Peter Reinhart : Bread Baker Apprentice, I realized that bread baking is not an easy task. The book is excellent, full of detail how to create best bread through fermentation stages. But it takes most of the recipe several hours to days to actually produce beautiful handmade bread.

We've been tried several recipes, but the easiest and worthiest is Pizza Dough Napoletana. Even though the whole process is quite tasking, I began to understand the essential of baking bread. It must be patient and follow the instruction strictly. It could be hard for beginner like me, but in the end it was a rewarding, a nice piece of bread with lovely smell filling in your kitchen. It was worth for every minutes you've spent.

We loves pizza so much, so we decided to try create our own pizza dough, putting the topping as our preferences. For trial we've using different flour from whole wheat, all purposes into bread flour. The regime was detail but make sense in many form of food science. The flour should be chilled first to let it not so fast react when mixed with yeast. It's all about chemistry and math. (It does as the book excerpt the formula into baker's percentages)

The size of dough is about right for two. The recipe let us to divide into six dough that can be frozen until 3 month. (It's rare to reach that time limit, always less than two months because we are pizza mania). To thaw and let the yeast back to life only need a day in the fridge, and two hour in room temperature. The last batch we did with bread flour made the dough more spongy, increasing size in significant amount. It also create crispier crust with lovely bubble of air.

Other key feature on pizza making is the stone bread at high temperature oven. (Peter suggested 500-550F which done by stone to distribute the heat evenly ). We've experimenting all sort of combination of topping, but turned out the Anchovies and smoked salmon with green pesto is the best one.


Anchovies and Smoked Salmon Pizza

Ingredients
1 Pizza dough Napoletana from Peter Reinhart's (recipe here at Heidi Swanson, let two hours in room temperature if the batch fresh or thaw a day before in refrigerator.
Olive oil for spraying
All purpose Flour for dusting
Semolina for layering on the stone

Topping :
2 tablespoon of green pesto, fresh on olive
two big flanks of smoked salmon, we uses most Scottish one
couple tablespoon anchovies
sun dried tomatoes chunks
handful of green olives
1 cup fresh mozzarella cheese
1 cup shredded Swiss cheese
Note : use most of topping with oil based rather brines as water usually seep into the dough, it will finished with no solid bread surface.

  • Punch the pizza dough to reduce the air, then start stretching (follow the instruction from the recipe). If you facing hole or very thin layer, do it again once until you get the nice even thickness. Do not let hole as it tends ruin the topping and whole performance.
  • Spread the green pesto on top of dough, followed by salmon and anchovies. Filling the gap with cheeses and olives.
  • Slide the pizza onto the oven using pizza peels with semolina flour on the base. Bake for 2 minutes then rotate to another 5-8 minutes. (the pre-heat should be done half an hour before or more to let the stone ready).
  • Let it rest for 1-2 minutes then cut, ready to serve.

Sunday, August 3, 2008

Just like in the book : A Fig cake for Fall

I made this cake to celebrate abundant fresh figs in this area. I went to local market and spot two different kinds. Mission figs came the name as the Spanish mission settled in San Diego to grow these ficus. Calimyrna figs in Jaoquin Valley California have more nutty taste. I choose the mission figs as it has bloodied purple colour, blend nicely with ruby port.

I did not find any problem since I decided to follow strictly Dorie's recipe. The only difficulty I’ve got that I have to scan isles in Safeway to find ruby port. I couldn't find small bottle though, instead I had to buy Fairbank bottle probably enough for 5 years!

As mention the cake supposed to be on the fall seasion, but hey.. figs already come out in California so what's the problem? Dad Gordon in Weymouth must be envy that we found lots fresh figs in the end of July while his tree probably still on the green stage. Keep it up Dad otherwise the squirrel eat it all!

I agreed with suessschnabel that this cake lacked of spice. But to add positive feedback honey that put in actually quite good to replace sugar. It turned out that the batter looked not nice (Dorie mentioned it), I kept whisking but the batter not even getting smoother. I thought the lacked of sugar could be result bigger flakes of cake.

The sauce I produced slightly thicker than should be. I have to put some more water, heat it in microwave for one minute and served with the cake. Indeed, nice to enjoy the cake when weather little bit cool.

Final result : just like in the book page. WOW!


A Fig Cake for Fall
from "Baking - From my home to yours" by Dorie Greenspan

3/4 cup ruby port
1 cup honey, divided
2 thin slices lemon
16 - 20 fresh figs, stemmed and halved
1 1/2 cups all-purpose flour
1/2 cup yellow cornmeal
2 teaspoons baking powder
1/4 teaspoon salt
1/4 cup sugar
grated zest of 1/2 lemon
1 1/2 sticks unsalted butter, at room temperature
3 large eggs, preferably at room tempereatur
1 teaspoon pure vanilla extract

For the figs and sauce:
Stir the port and 1/2 cup of honey together in a small saucepan. Toss in the lemon slices and bring to a boil over medium heat. Lower the heat, add the figs, cover the pan and cook for 4 to 6 minutes, until the figs are soft. Using a slotted spoon, transfer the figs to a bowl. Raise the heat and cook the poaching liquid until thickened. Set the sauce aside.

For the cake:
Preheat the oven to 350 degrees F. Butter a 9-inch springform pan and dust the insides with flour, tapping out the excess.

Whisk together the flour, cornmeal, baking powder and salt. Put the sugar and lemon zest in a bowl and rub them together with your fingertips until the sugar is moist and aromatic. Add the butter. Beat butter and sugar together until creamy. Add the eggs one by one ( one minutes difference), beating well after each addition. Pour in the remaining 1/2 cup honey, add the vanilla extract and beat for another 2 minutes. Reduce the mixer speed to low and add the dry ingredients, mixing only until they are incorporated. Pour the batter into the prepared pan. Jiggle the pan from side to side to spread the batter evenly, then scatter the poached figs over the top.

Bake for 55 to 60 minutes, or until a knife inserted into the centre comes out clean. Transfer the cake to a rack and cool for 10 minutes. Run a blunt knife around the edges and remove the sides of the pan. Cool the cake to slightly warm or to room temperature before serving it with the sauce.

Sunday, July 27, 2008

Dimply Plumcot Cake : aroma dari kapulaga hijau

Menambahkan kapulaga hijau di resep ini sungguh menambah harum. Saya belum pernah mencoba mendapatkan bubuk kapulaga sendiri. Dari bijinya cukup dikeluarkan di gerus halus dengan penggerus keramik ini. Jenis kapulaga yang saya pakai adalah warna hijau -jenis yang tidak sama dengan di Indonesia atau Asia. Kita biasa melihat kapulaga dengan warna coklat, berukuran lebih besar (2X dari si hijau) dan juga berkerut kulitnya.

Bahan disini agak saya mainkan sedikit. Gula coklat misalnya, saya pakai campuran dengan gula demerara yang lebih organik. Minyak Canola tersedia banyak di supermarket. Sedang buahnya saya coba ganti dengan plumcot hijau. Beda dengan plumcot merah adalah yang hijau jauh lebih kecut tapi secara visual tidak terlalu cakep.

Resep ini cuma sebagai pelepas percobaan fruit pies yang saya coba sebelumnya. Cake Fruits atau kue buah sedikit berbeda dengan faktor kesulitan menengah. Jadi ngga susah dan ditanggung lebih cepat daripada pies.


Dimply Plumcot Cake

- untuk 8 porsi -
Adaptasi dari Dimply Plum Cake Baking From My Home to Yours : Dorie Greenspan di Serious Eats

Dibutuhkan

1 1/2 cups tepung terigu all-purposes
2 sdt baking powder
1/4 sdt garam
Percik1/4 sdt kapulaga hijau bubuk (pilihan)
5 sdm mentega tanpa garam dalam suhu ruang
3/4 cup gula coklat
2 telor ukuran besar
1/3 cup minyak yang tanpa aroma seperti canola atau bunga matahari
irisan kulit dari 1 bh orange
1 1/2 sdt sari vanilla
6 buah plum dipotong dan bijinya diambil


Persiapan : letakkan rak di tengan oven dan pre-heat dalam suhu 350F. Lapisi nampan panggang ukuran 8in yang dalam dengan mentega dan tepung, ketuk2 ringan untuk mengurangi kelebihan tepung dan letakkan pinggan dalam lapisan panggang.

Campur tepung, baking powder, garam dan cardamon.

Dengan mixer, campur mentega dalam kecepatan sedang hingga lembut seperti krim selama kurang lebih 3 menit. Tambahkan gula dan campur hingga 3 minut lagi, lantas masukkan telur satu persatu dengan jeda 1 menit untuk masing2 telur. Masih dengan kecepatan sedang campur minyak, irisan kulit oranges, dan vanilla ke dalam adonan hingga halus sepeerti kain satin. Kurangi kecepatan mixer hingga rendah dan kemudian tambahkan campuran kering (no 1) hingga adonan bercampur merata.

Aduk dengan spatula hingga ke bawah mangkok untuk melihat jika ada bahan kering di bawah, kemudian pindahkan adonan ke dalam cetak panggang sambil diratakan atasnya. Tempatkan buah plumcot diatas adonan, dalam pola tertentu hingga buah duduk dengan manis di adonan.

Panggang sekitar 40 menit hingga atasnya terlihat warna coklat. Cek dengan melihat buah plum dan masukkan pisau kecil ke dalam roti. Jika matang pisau akan nampak bersih. Pindahkan kue ke dalam rak pendingin selama 15 menit -waktu dimana jus dadri buah akan masuk ke dalam kue. Dengan pisau, potong pinggiran kue melingkar di cetakan, gerakkan sedikit dan keluarkan dengan hati-hati. Biarkan kering dengan permukaan diatas.

Menyimpan kue : bungkus kue dengan plastik tahan udara dalam suhu ruang selama 2 hari, disaat kue menjadi lebih lembut dan sedikit berair.

Bermain resep : Silakan mengganti aroma di resep ini. Bahkan bisa mengganti dengan buah plumcot dengan yang lain. Ini adalah yang disarankan Dorie :

  • buah apricot, irisan buah orange dengan bunga lawang/pekak (star anise),
  • buah peach, irisan lemon dengan daun basil (kemangi) segar
  • buah cherry dengan irisan jeruk nipis
  • buah blackberry dengan irisan lemon, jeruk nipis atau orange


Friday, July 18, 2008

All American All Delicious Apple Pie


Argumentasi siapa yang menciptakan Apple Pie mungkin ngga ada habisnya. Yang pasti orang Amerika lah yang mempopulerkannya. Saya ingat Apple Pie pertama yang saya icip adalah deep fry apple-pie dari McDonald. Well, rasanya yah begitu lah. Tapi yang saya ingat untuk menghasilkan rasa ini haruslah dengan buah apel untuk dimasak (cooking apple). Teksturnya lebih keras, jadi jika dipanggang tetap dalam bentuk asli, lebih kecut dan renyah tapi jika dicampur dengan kayu manis rasa manis dan aroma itu meleleh bersama.

Saya menemukan Granny Smith Apple, jenis apel yang agak jarang di Inggris tapi ternyata banyak sekali disini. Apel Bramley biasa ada di Inggris pada musim gugur atau menjelang dingin. Begitu menemukan Granny Smith di tengah musim panas saya mencoba membuat Apple Pies.

Ini sebenarnya percobaan kedua dengan resep yang sama. Masih dari bukunya Dorie, yang menulis 2 halaman penuh berisi detail bagaimana membuat Apple Pies Homemade in American’s way.

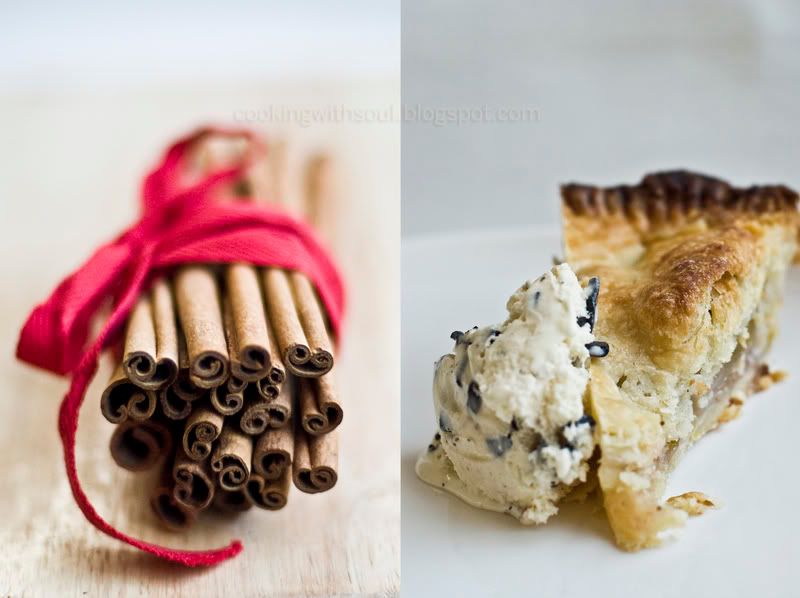
Saya tetap membiarkan kulit apel karena lebih kerasa dan memotongnya dalam ukuran sedang. Dorie sendiri lebih suka mengiris tipis, jadi seperti membuat lapisan. Saya hanya menggunakan 3 biji saja karena saya memakai loyang pie yang datar. Hasilnya cukup untuk 2-3 malam hidangan penutup berdua dinikmati dengan es krim vanilla coklat. Rasanya? Yummm….lebih uenak daripada bikinan McD. Dijamin!

Saran untuk menghasilkan apple pies yang yum :
  1. Untuk kulit pie (pastry) jangan terlalu lama disimpan di kulkas. Kurang dari 1 jam udah cukup, dan biarkan 2-3 menit dalam suhu ruang
  2. Pastry yang baik akan terlihat nyampur antara tepung dan mentega. Beda adonan ini dengan yang lain adalah “short dough” atau tidak terlalu elastis sehingga kemungkinan sobek besar. Semakin tidak elastis semakin crumbly hasilnya. Beda dengan adonan untuk pizza misalnya yang semakin elastis makin baik.
  3. Kalau bisa gunakan ‘cooking apple’ tapi jika tidak pakai apel hijau dengan tingkat kecut yang tinggi. Bisa juga dicampur apel yang manis dengan mengurangi kandungan gula.
  4. Saya mencoba rolling adonan dengan dasar plastik, jadi tidak terlalu banyak menggunakan tepung agar ngga lengket. Ternyata membuat adonan menjadi lebih tidak elastik dan cepat dibuat.
  5. Dipakainya bread crumbs (serpihan roti) untuk dasar pie adalah agar bawahnya tidak terlalu basah dan lembek.
  6. Untuk pengharum saya mengikuti resep Dorie yakni kayuwangi dan pala. Kalau bisa masih segar dibuat bubuk. Misalnya kayuwangi beli batangnya dan digepruk halus, sedang pala diparut atau ditumbuk. Ohya pala lebih berminyak jadi pasti lebih lengket.
  7. Bahan bumbu lain bisa dimodifikasi menjadi kapulaga (1/4 teaspoon) atau bubuk jahe (1/2 teaspoon).


All American All Delicious Apple Pie


Untuk membuat kulit pie 2 lapis (double crust)
3 cups tepung terigu all purpose
¼ cup gula pasir
1.5 teaspoon garam
2.5 stick (10 onz) mentega dingin potong kecil2
1/3 cup margarine dingin , potong kecil2
½ cup air es (atau secukupnya)

Untuk filling (isi)
3 biji apple Granny Smith (atau cooking apple lain)
¾ cup gula pasir
irisan kulit dari 1 jeruk lemon
2 tablespoons tepung tapioca
½ teaspoon bubuk kayumanis
1/8-1/4 teaspoon bubuk pala
¼ teaspoon garam
2 tablespoons bread crumbs (atau biscuit yang diremah)
2 tablespooms mentega tanpa garam untuk taburan

Glazing (sapuan)
Susu atau krim
Gula pasir untuk taburan

Proses :

Cara membuat kulit pie bisa dibaca disini

Panaskan oven dalam suhu 425F letakkan rak ditengah.

Potong dan keluarkan isi buah apel kemudian campur dengan gula, irisan jeruk, tapioca, kayumanis, pala dan garam. Aduk hingga semua permukaan apel terlapisi dengan baik. Sisihkan.

Siapkan loyang 9inch, beri mentega. Keluarkan adonan kulit pie yang sudah dibuat sebelumnya. Gunakan plastik pelapis sebagai dasar dengan sedikit tepung agak tidak lengket. Rolling untuk membuat lapisan kulit bawah dan atas.

Letakkan kulit bawah di loyang pie. Taburkan potongan roti/biscuit di dasar loyang sebelum menuang filling. Atur apel sesuai selera. Kemudian taburi potongan mentega diatasnya sebelum ditutup dengan kulit atas.

Setelah kulit atas diletakkan, dengan sedikit air, lekatkan kulit bawah dan atas. Dengan pisau tajam potong kulit sisa dari tepian loyang. Kemudian buat potongan diatas kulit atas, sekitar 5-6 sayatan.

Sapu permukaan pie dengan susu atau krim. Taburi dengan gula sebagai pemanis.

Panggang dalam waktu 15 menit. Kemudian turunkan suhu menjadi 375F dan panggang dalam 50-60 menit. Cek ketika mencapai 40 menit untuk melihat apakah kulitnya terlalu matang. Jika ada tanda, segera tutup dengan aluminium foil.

Jika selesai, keluarkan dari oven dan biarkan hingga hangat atau suhu ruang. Sajikan dengan es krim.